
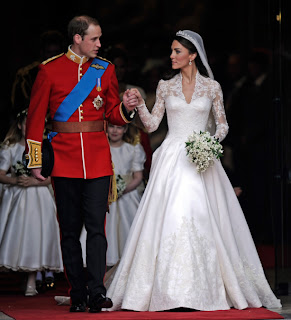
With all the hoopla in the weeks before William and Kate's wedding, I surprised myself by staying quite calm. Everyone knows I'm enamored with England and all that is English, but with a busy week at work and life I didn't have much time for the pre-wedding updates. That is until the royal wedding yesterday. I was distracted at work all day! I couldn't get enough of the wedding pictures and news report. I couldn't help but smile when seeing how happy William and Kate were. I also looked at some of my own wedding pictures, reminiscing about my own wedding day. Plus, I love, love, loved Kate's wedding dress! So classy and elegant. I send my congratulations from across the pond to the new happy couple! (Because I'm pretty sure they are going to read this, haha.)
In other news, while Danny and I aren't big TV watchers, we do use Netflix to watch past shows on occasion. Over the past couple months we have been watching "Pushing Daisies". We ended it last night and I'm so sad! Since it was canceled after the 2nd season I have so many unanswered questions. I really want to contact the writers of the show to pick their brains about their plans if the show had continued. I really need some closure! We watched the pilot of "Macgyver" as a distraction, which was pretty amazing and cracked me up at the same time. However, it just wasn't the same, sigh.

In other news, while Danny and I aren't big TV watchers, we do use Netflix to watch past shows on occasion. Over the past couple months we have been watching "Pushing Daisies". We ended it last night and I'm so sad! Since it was canceled after the 2nd season I have so many unanswered questions. I really want to contact the writers of the show to pick their brains about their plans if the show had continued. I really need some closure! We watched the pilot of "Macgyver" as a distraction, which was pretty amazing and cracked me up at the same time. However, it just wasn't the same, sigh.
I loved watching the Royal Wedding at a party with my friends and our daughters. (See blog for all the fun pictures!) I agree - her dress was stunning and classy and she is so beautiful. I hope they can make their marriage last.
ReplyDeleteThey might have had a nice wedding, but yours was definitely better. I never heard the words "til death do us part" at yours.
ReplyDeleteI have a friend who went to KC at 3 in the morning to see some exhibit and then watch the wedding with a bunch of people who were dressed up in hats and everything! Crazy. I loved all the pics too.
ReplyDelete